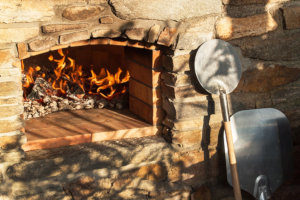
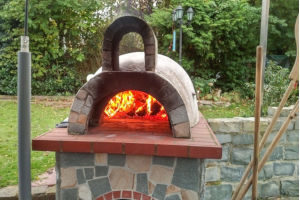
 What’s better than a warm, delicious, homemade pizza? The same thing, but instead of coming from the oven in your kitchen, it’s coming from a wood-fire oven — that you built yourself. While it sounds like a huge project, it’s possible for you to build your very own pizza oven in your backyard using some materials easily found at a hardware store and a pizza oven kit.
How To Build An Outdoor Pizza Oven Step By Step
Instead of summer barbeques, you’ll be hosting pizza nights as your friends and family gather around the oven for a truly unique and memorable party. Here’s how to build an outdoor pizza oven step by step.
Materials
To build your oven, you’ll need the following supplies:
- Fill dirt
- Concrete mix
- Mixing tubs
- Cement trowels
- Grout bag
- Welder
- Circular saw
- Safety glasses and gloves
- A shovel
- Tape measure
- 8-inch cinder blocks
- Exterior grade plywood
- Angle iron
- Rebar
- Brick tile
- An oven kit
You’ll also need a base, such as a cement pad or sturdy brick patio, on which to build your oven. Once you’ve collected your materials and mapped out the space for the foundation, you can begin constructing. Note that additional materials may be necessary depending on the type of oven you select, so carefully read the instructions before you begin work.
Build the Base
 First, you’ll need to build an elevated platform for your oven. Before building the platform, ensure that the ground in the selected area is level. This crucial step will help your oven sit evenly, creating a flat surface for cooking and helping to prevent fires. Use fill dirt to level the area if necessary.
Using the cinder blocks, build an L-shaped structure that will fit the oven and also create some counter space.depending on the size of your cinder blocks, four blocks high may be enough. Leave the holes on the blocks exposed, then mix the concrete and use it to fill the holes in the blocks along the perimeter to create a sturdy foundation.
Base Coverage
Next, cover the base with stones or bricks to create a prettier foundation for your oven. Brick tiles create a quick, durable finish, but you can use any material that fits with your decor. Mix mortar or cement, depending on the coverage manufacturer’s instructions, and press your chosen cover onto the cinder block base. Using spacers, such as half inch pieces of scrap wood, can help you ensure that bricks or tiles are evenly spaced. Fill the spaces using a small trowel or grout bag.
Create the Countertop
Now you can build the countertop for your oven. Basic concrete is stable enough to hold the oven and can be designed to fit your outdoor decorations. Cut a piece of plywood to the size of the countertop, and weld a frame around it with iron or attach wood edging with glue and galvanized nails. Smooth out any metal corners with a grinder and spray paint for an even finish. Then, lay the plywood frame on top of the base and criss cross rebar on top of it to support the concrete and prevent cracking. Attache the rebar with wire ties and pour concrete over the frame. Smooth the concrete with a trowel or wood board, then let it cure for at least one day. When there are no dark spots left, the concrete is completely dry.
Oven Assembly
You can finally begin assembling your pizza oven. First, do a dry installation of the oven to see how it will fit on your countertop. Center the oven and make an outline of it with pencil or chalk to mark the space. Then, take the oven apart and begin assembling it with the included grout or other adhesive, following the directions in your kit. Install the floor of your oven and ensure that the tiles are level, then let them sit for one hour before continuing. Grout the tile throughout and smooth it to prevent chips.
Then, build the dome. Dome pieces typically interlock snugly and do not need a large amount of grout. Do not grout dome elements to the floor or refractory pad. Be sure to leave any space between the floor and dome walls open, as this allows the floor tiles to expand when heated. Apply a thin layer of refractory grout to the outside seams of the dome only. If your oven has an arch, you can face it with tile or other decorate materials when the oven is done.
Finally, attach the chimney flue. Chimney flues typically include a small connector that is placed on top of the flue and holds a six inch pipe. Grout these pieces together with enough material to ensure that they are level. Your oven is now complete. You can decorate it with heat-safe paint, stucco, or tile for a finishing touch. The oven may need up to 20 days to fully cure before it can be safely used. After this point, you can enjoy wood fired pizzas from the comfort of your own backyard any time. Be sure to stock up on fuel and pizza ingredients in the meantime!
Contact A Maryland Fill Dirt Contractor For More Information
 Contact the Maryland fill dirt contractors at Dirt Connections for more information about using fill dirt in your outdoor projects. The company’s fill dirt is free of large particles, such as rocks and organic matter, making it the ideal material for filling holes, leveling ground, and creating different levels of elevation in your backyard to section pieces for various purposes. Dirt Connections offers free fill dirt delivery for all of your projects and also provides dirt removal services if you find yourself with a surplus. Prior to receiving your fill dirt, you must schedule a free site inspection. A licensed contractor at Dirt Connections can provide you with a free estimate on the amount of fill dirt needed, help you set up the necessary appointments to begin your latest project, and answer any questions you may have regarding your fill dirt delivery.


