 As the parent of a young baseball or softball player who dreams of becoming a star pitcher, you may spend a lot of time shuttling them back and forth to a field where they can practice the right way. But have you considered building a pitching mound in your backyard? You may be surprised to learn just how easy it is for any DIYer to do. Think of all the time you will not have to spend transporting to and from the field, and if there are other kids nearby who also love to play, your backyard pitching mound may become the most popular spot in the neighborhood.
Building a Pitching Mound in Your Backyard
Whether your kid plays softball or baseball, it is relatively easy to create a space for them to practice in your backyard. The following is a step by step guide for building a backyard pitching mound.
1. Select the Location
Find an area in your yard that is level and large enough to accommodate the mound and home plate. To figure out the size area you need, find out the required dimensions from the baseball or softball league appropriate for your child’s age. The size of the mound involves the circumference and height, and the location of the pitching rubber on the mound. You also need to know the distance from the mound to home plate, mentioned in step 6. Note that the pitching mound size and distance to home plate will increase as your child gets older.
2. Level the Site
The best site for your backyard pitching mound will be one that is level. That means the site is not on the side of a hill and the ground is even. To level the site, contact a fill dirt supplier and bring in as much fill dirt as needed. You can use it to fill any low spots and holes, as well as correct slopes. Not only do you want your pitching mound to simulate a real baseball field, you want to avoid injuries that holes and low areas can cause.
Fortunately, Dirt Connections allows you to purchase a fill dirt delivery in order to receive the fill dirt required for your backyard pitching mound. Remember, the fill dirt itself is free, and you are only paying for the delivery.
3. Excavate the Turf
Begin by measuring and marking the place on the ground where your mound will be. You can use spray paint to delineate the circle for the pitching mound and the place for home plate. Remove the turf in the mound area. After removing the turf, smooth out the excavated area to level it and create an even surface. To help deter weed growth, cover the area with landscape fabric and secure it with landscape staples.
 Find the center of the circle. Use a hammer to drive a stake into the ground at the center point. Use a tape measure or yardstick to measure the height the mound needs to be from the ground surface. Place a mark on the stake showing where the correct height of the mound will be. You will use this mark to know when to stop adding dirt to your mound.
4. Build the Mound
You can purchase a premade mixture of mound clay for this, but you should consider a less expensive alternative. You can use clean fill dirt delivered to you by your local dirt supplier. Fill dirt is ideal for this purpose because it contains no organic material and will not support vegetation, thus minimizing the need for weed control.
The term “clean” fill dirt simply means the material contains no contaminants. That is, the dirt has been screened to remove roots, or other objectionable materials. It should not contain any additives or dangerous materials such as refuse, rubble, muck, metal, glass, wood or other foreign materials. Good quality inorganic clean fill dirt consists of at least 50% clay. This makes it easy to compact and provides a good base that will not sink or collapse over time. If you do not use this kind of material, your pitching mound will erode and become unstable very quickly, and will not conform to the league requirements.
Now that your mound has been excavated and staked, you can start laying fill dirt on top of the landscaping fabric. Lay one inch of fill dirt on the circle and tamp it down until it is firm. Repeat this layering and tamping process with one inch layers of dirt at a time.
Make each subsequent layer about 3 to 6 inches smaller in diameter. Continue laying smaller and smaller diameter circles of mound clay on top of each other until the mound has reached the height marked on your stake in the center of the circle. Smooth the mound, rounding it out where needed, and fill any low spots.
5. Install the Pitching Rubber
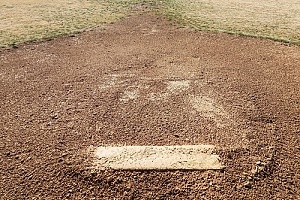
After the mound is built and smoothed, you need to install the pitching rubber. You can stake it into the mound or slightly bury it. Your objective is to keep the rubber flat, secure and immobile. Whether you choose to purchase a rubber or construct it yourself, this should be the easiest step of the process.
6. Determine the Distance From the Rubber to Home Plate

 A pitching mound would not be complete without a home plate. If you have not already done so, measure the proper distance from the mound to the spot for home plate and mark it. For baseball, the plate should be 46 feet from the mound for Little League®, 50 feet for intermediate leagues, and 60 feet for high school and above. For softball, the plate should be 35-40 feet from the mound for Little League® and 43 feet for high school and above.
7. Install Home Plate
Excavate the turf under home plate and dig down about three inches. If you have the correct dimensions for the batter’s box and feel up to a little extra digging, excavate that area as well. Cover the excavated area with landscaping fabric. Lay a foundation of fill dirt and tamp it well. Secure home plate in its proper location.
Now get out there and practice!
Contact the Experts at Dirt Connections For More Information
For more information and guidance on building a backyard pitching mound, speak to the fill dirt contractors at Dirt Connections. They can help you determine how much dirt and the type you need, as well as schedule a convenient time for delivery. They can also provide advice on any other construction or landscaping project you may be planning. Contact Dirt Connections for more information about the dirt you need for any of your outdoor projects.


