If you have worked with concrete in the past, you may be considering building your own concrete driveway. Although concrete may be relatively easy to work with on a small scale, keep in mind that pouring an entire driveway can be challenging – and it is even more daunting if the driveway is sloped.
Although it is possible to carry out this type of job if you have experience with pouring concrete, there are some important considerations to keep in mind to ensure you get the best results. Here are the steps that should be followed to build a concrete driveway on a slope.
Obtain a Permit

In some areas, you may need to obtain a permit prior to building a new concrete driveway. Some states and municipalities may only require permits for driveways of certain heights or widths, but be sure to check before proceeding. Your city’s website may have a section where you can download permit applications for these projects.
It is also a good idea to check with your homeowner’s association if your neighborhood has one as they may have rules in place governing where and how you install a driveway.
Ensure You Have a Solid Base
You need a firm and solid base to support the weight of concrete. For homes that have a loose and sandy base soil, clay can be added to firm it up; if the soil is too loamy, gravel or sand can help level it out. Then the soil should be compacted to ensure it is firm enough to serve as a base for the driveway.
Level the Surface
Before you begin pouring the concrete, it is important to prepare the ground so that the surface is as level as possible from side to side. Failing to do this will result in a driveway that is not level the whole way across. It may be necessary to remove some dirt from the surface of the ground in order to level the area out. Although you want to make the surface as even as possible, keep in mind that you will be able to check the surface more accurately after building the driveway’s form, so do not worry about perfection at this stage.
While leveling the driveway, be sure to remove any rocks, dirt or other debris that could get in the way of the pour.
Space the Forms

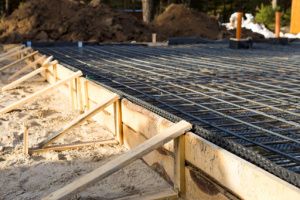
Create a form using one-inch stakes driven into the ground at each corner of the driveway. Ensure that these stakes are placed at an equal distance from top to bottom as well as from side to side. Then, stretch a string from the top stake to the bottom stake as a guide for placing the side form.
Once these two parallel strings are fixed, ensure that the distance between them is the same throughout their length. In addition, you must make sure that the distance from the strings to the ground underneath them is uniform as this can help to ensure that the pour will be of a uniform depth.
Order the Concrete
When ordering concrete for a sloped driveway, it is imperative to get the lowest slump allowed. A local building inspector can provide these allowances. The slump refers to the concrete mix’s consistency; concrete mix bearing a lower slump is more likely to stay in place once you have poured and leveled it thanks to its higher proportion of cement to water. Although this does make it more difficult to use, the final result will be stronger.
Getting the right type of concrete can help you avoid problems when it comes to the driveway’s structural integrity and strength. In addition to needing to support vehicles and foot traffic, the concrete poured on a slope needs to be able to resist gravity and avoid downhill slumping. The last thing anyone wants while pouring a concrete driveway is for all the concrete to start flowing downward, pooling at the bottom and setting. Getting the slump wrong could prove to be a waste of time and money. If you have any doubt, consider performing a slump test on your concrete when it arrives to ensure it is suitable for your driveway project.
Once you have obtained the slump allowance from the local building inspector, you can place your order with a concrete provider. Keep in mind that concrete is sold in cubic yards, so it will be necessary to convert the measurements of the driveway. Be sure to add around 10 percent onto the figure you calculate to allow for mistakes or spillages.
Pour the Concrete

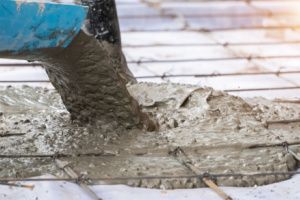
The concrete truck should begin pouring into the bottom part of the slope and then work upward. If the pour has different footing depths, focus on pouring the deepest footings first to help prevent the concrete from running downhill. As the concrete is being poured, a concrete vibrator can be used in the wet concrete to remove bubbles and voids and compact the concrete. After vibrating, scrape off excess concrete from the top to reveal the smoother and more even layer underneath it.
In some cases, you may wish to add reinforcements into the forms to ensure the concrete stays in place. For example, rebar rods can be laid into the concrete while it is wet to provide additional support.
Finish the Concrete
Once the concrete has been poured, a 2×4 can be placed across the tops of your two side forms and moved from side to side to create a level surface for finishing the concrete. If a rougher surface is desired, you can brush the concrete with a stiff broom once it has partially set up but before it has hardened fully. This helps you avoid ending up with a slick surface that can be dangerous when wet.
Keep in mind that concrete will need at least 72 hours to harden for proper drying and curing. Once it is fully hardened, you can remove the wooden form and look over the final project.
Discuss Your Project With the Northern Virginia Driveway Contractors
Pouring a concrete driveway on a slope can be a challenge, even for those experienced with DIY home projects. Eliminate stress and ensure a professional result by trusting the job to the experienced driveway contractors at Dirt Connections. Contact us today to discuss your project or request a quote.
Summary

Dirt Connections was started with one goal in mind: providing quality residential and commercial construction services to clients on time and on budget. Reach out for more information on how we can support your next project.
For your convenience our estimates are free and by appointment. Call 703-940-9949 for a free estimate today!


