 Any time you are growing plants, you need to ensure that you are using the correct type of soil for optimum results. However, it is difficult to ascertain what type of dirt you have in your garden simply by looking at it.
Thankfully, there are several easy tests that you can carry out to find out as much as possible about your soil’s drainage, acidity, mineral density and overall composition. By taking the time to learn more about your soil before planting, you can avoid disappointing results.
5 DIY Soil Tests
Here are five simple tests that can provide you with valuable information about your soil:
The Squeeze Test
A squeeze test is one of the most basic types of soil tests, and it is extremely easy to carry out on your own. All you need to do is take a handful of soil that is moist but not wet from your garden and squeeze it firmly. Then, open your hand and see how the soil reacts.
If your soil holds its shape, try poking it.
- If nothing happens when you poke it, your soil is mostly clay. Although this is a very nutrient-rich type of soil, it is slow to drain, which means that water may sit around the roots of your plants for too long and cause them to rot.
- If the soil crumbles when you poke it lightly, you have loam soil, which is the ideal type of soil for planting nearly everything thanks to its ability to retain nutrients and moisture without becoming soggy.
If your soil falls apart when you open your hand, it is considered sandy. Although sandy soil drains quickly, it struggles to retain the nutrients and moisture that your plants need to grow and thrive.
Once you find out what type of soil you have, you can take steps to improve its composition.
The Mason Jar Test
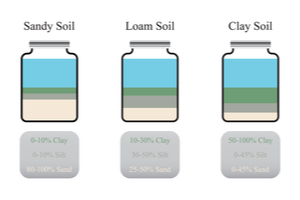
If you want to determine if you have loam soil in your garden, which provides the optimum mix of clay, sand and silt in equal proportions, you can carry out the mason jar test.
 Take a clean and clear empty mason jar with a tight lid and fill it halfway with soil from your garden. Then, add water until the jar is roughly three-quarters full. Screw the lid on tightly and shake the jar for several minutes to ensure that every particle of dirt is suspended in the water and none is stuck to the lid or sides of the jar.
Leave the jar to rest for several hours until all of the particles have settled. You will find that they separate into layers of sand, silt and clay, with sand on the bottom, silt in the middle and clay at the top. If these layers are roughly equal in size, your soil is loamy and your gardening efforts are likely to be successful.
The Worm Test
This test is not very enjoyable if you are squeamish, but it is a great way to determine whether your soil has all of the beneficial microbes that it needs for optimum health and strong plant growth. Worms are excellent indicators of your soil’s overall health when it comes to biological activity.
You need to perform this test on warm soil that is at least 55 degrees and somewhat moist. However, you should not try this when your soil is soaking wet.
Dig a hole that is roughly a foot across and a foot deep, and place the soil that you remove on to a piece of cardboard or a tarp.
Use your hands to sift through the soil as you return it to the hole and count the number of earthworms you encounter.
If you find 10 or more worms, it indicates that your soil is in good shape. However, if you find fewer worms, your soil may need more organic matter to support a healthy worm population. It may also indicate that your soil is currently too alkaline or acidic; a pH test can provide further guidance in this regard.
The pH Test
A pH test will measure the acidity level in your soil, which has a significant influence on how well your plants will grow. pH tests use a scale that runs from 0 to 14. Zero indicates soil that is very acidic, while 14 is highly alkaline soil. Most plants prefer soil that has a fairly neutral pH in the range of 6 to 7. If the soil’s pH level is below 5 or above 8, you will want to take steps to neutralize it.
You can purchase simple pH test kits at your home and garden center. Although these tests are considered quite accurate, it is important to follow the instructions carefully. After you have taken steps to correct an undesirable pH level, if you find that your plants still struggle, you might consider collecting a soil sample and sending it to a lab for further analysis. This can provide information about any mineral deficiencies that your soil may have as well as how you can correct it.
The Percolation Test
 Drainage is an important element of plant health. Poor drainage can be particularly damaging to plants such as culinary herbs as they may die quickly if their roots are kept too wet for a prolonged period.
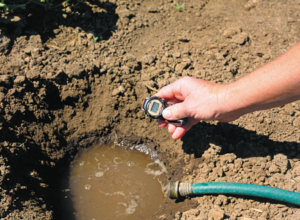
You can check your soil’s drainage using the percolation test. First, dig a hole that measures around 6 inches wide and a foot deep. Fill it with water and then let it drain completely. Then, fill the same hole with water again. This time, keep track of the length of time it takes for the water to drain. If it takes longer than 4 hours to drain completely, this indicates that your soil’s drainage is poor.
Get In Touch With Dirt Connections
If you need high-quality soil for your garden or have questions about the right soil for your project, get in touch with Dirt Connections. We can provide the ideal soil and dirt for a range of projects to customers in the Northern Virginia area.
Summary

Dirt Connections was started with one goal in mind: providing quality residential and commercial construction services to clients on time and on budget. Reach out for more information on how we can support your next project.
For your convenience our estimates are free and by appointment. Call 703-940-9949 for a free estimate today!


