 Once you have decided to keep chickens, you will need to have a place for them to stay. Chicken coops are relatively easy to build, but you do need to know a few things before you begin. This short guide will help you plan and build a coop that your chickens will love.
Planning for Size and Location
Before you even purchase materials, you will need to know what size your coop will be. Two to three square feet inside the coop and an additional four to five square feet per bird in the run are considered the minimum size requirements. More space is better, as chickens will fight more in cramped spaces.
If your chickens will be laying eggs, you need at least one nest box for every three hens. The next box itself should be about one square foot. You also need to carefully consider the location. Chickens need shade on hot days and access to the sun on cold days.
Placing the coop beneath a deciduous tree is ideal, since it provides shade in the summer but lets in sunlight in the winter. Barring that, a shade cloth over the run that can be removed in winter is a good choice.
Materials and Building the Frame
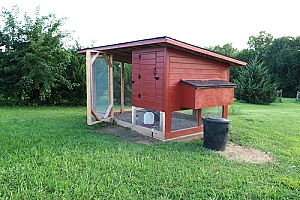 When choosing materials for your coop, remember that it will need to endure all weather conditions and be sturdy enough to keep predators out of the coop. You will want tough, durable materials that can handle rain, wind and raccoons.
Corrugated sheet metal and wood are probably the two most common chicken coop materials, and either of these (or both) will work very well. If you use wood, you should choose a type that is naturally resistant to rot like cedar or redwood. The preservative chemicals used in other woods can be harmful to your chickens.
Corrugated tin and wire mesh or chicken wire are the best and most commonly used metal materials. They can take a beating from the weather, and they will keep your chickens safe.
Basic Chicken Coop Design
The first step in designing a coop is to set up four 4 x 4 posts in the desired shape of the coop — generally a square or a rectangle. These will be the four corners of the coop. The space will depend on the size of the coop. The posts should be cut so that the front two posts are eight feet tall and the back two posts are six feet tall.
About two feet from the front right or left corner of the coop, another 4 x 4 post will be set to support the gate. This post should also be eight feet tall.
Next, a 2×4 post is attached to the corner post and the gate post at a height of six feet. If you are over six feet tall, these posts will need to be higher. A gate frame will need to be built to fit that space. That means it should be two feet wide by six feet tall.
Outfitting the Interior
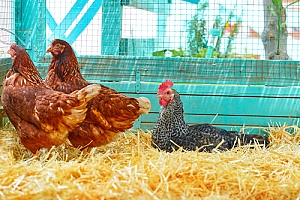 Before the interior is fully enclosed, it is a good idea to outfit it with everything it needs. This is a lot easier to do before it is closed up.
Straw should be spread over the floor in a thick layer to absorb droppings and water. A watering device should be hung from the rafters so that it is about 6-8 inches off the ground. A ramp with a gentle slope is needed to allow the chickens to easily walk from the run up into the nesting/roosting area.
Inside this enclosed area, there will need to be a roosting bar with at least eight inches of space per bird. This can be made of 2 x 2 lumber. Also necessary are the nest boxes mentioned earlier and another watering device along with a feeder. An incandescent bulb will provide enough warmth to extend the laying season, but is not necessary.
Completing the Exterior
To finish enclosing the coop, the roof and walls will be installed. Corrugated tin sheets are an excellent choice for the roof, since they are durable and weatherproof. Wood siding is good for the walls. When building the walls, it is good to keep in mind that there will need to be access to the interior for collecting eggs and cleaning out the coop.
12 x 12 hatches on the wall with the nest boxes will allow for egg collection, and a 12 x 12 hatch at the top of the ramp will give the hens access. A 2 x 5 hatch is usually large enough to allow entrance inside for cleaning the coop and refilling the water and the feeder. These should be secured with raccoon-proof hatches.
Ventilation is crucial, especially in the summer. The chicken door and wire mesh in the floor will allow air in from below, but installing vents near the top is necessary to ensure proper airflow. Vents can either be cut into the walls near the roof or gaps can be left between the roof and the walls, but either way, they will need to be covered with wire mesh.
My Premium Special Offers
For The New Standard of Excellence for DIY Chicken Coops!
You’re ready to reap the benefits of having chickens.
And you want to build your own coop.
But you know there are many different blueprints on the market.
So you need the right one.
And you’re eager to finally start living an eco-organic lifestyle.
Raise your own Cluck Norris and Yolko-Ono.
Have your own farm fresh eggs.
Every. Single. Morning.
But you need a simple place to start.
Announcing: The World’s Largest Collection Of 16,000 Wood Plans
Each of the 16,000 projects are detailed enough to leave nothing to guesswork, yet simple enough for beginners.
Now You Can Build ANY Shed In A Weekend Even If You’ve Zero Woodworking Experience!
” How to Liven Up Your Home With Over
7250 Breathtaking Landscaping Designs WITHOUT Hiring Costly Professional Landscape Designers…
Have you been in a car accident recently?
The Claim Buster eBook is written to help those who have been injured in a car accident, and those who weren’t injured but have a property damage claim with an insurance company.
Dirt Connections Receives Commissions For Successful Sales Transactions
Enlisting Experts for Help with a Chicken Coop
These are the basic steps needed to construct a chicken coop, but every coop will be slightly different. It all depends on how much space you have, how many chickens you want to keep, and why you are keeping chickens (eggs vs meat). Ultimately, building your own chicken coop should involve adding your own design touches to it to make sure that it actually suits your needs.
You may also find that you need to level an area of your yard before you can put in a coop. If that is the case, then you will need to find a service that can do that for you or at least provide the dirt needed to create a level area. Dirt Connections has you covered. We are also available to answer any questions you may have.
Whether you need to ask about our services or you want to have one of our contractors come out to your yard and give an estimate, our staff is here to help. We are experts in dirt removal, leveling and fill dirt delivery. We offer other services as well, so no matter what your project is, we can help. Contact Dirt Connections today.


